MongoDB maven:
 <dependency>
<groupId>org.mongodb</groupId>
<artifactId>mongo-java-driver</artifactId>
<version>3.2.0</version>
</dependency>
http://mongodb.github.io/mongo-java-driver/3.0/driver/getting-started/quick-tour/
MongoDB maven:
<dependency> <groupId>org.mongodb</groupId> <artifactId>mongo-java-driver</artifactId> <version>3.2.0</version> </dependency>
http://mongodb.github.io/mongo-java-driver/3.0/driver/getting-started/quick-tour/
1. Download Maven:
http://maven.apache.org/download.cgi
Extract to hard drive (ex: C:\Program Files\apache-maven-3.3.9)
2. Add to System Variables
Open System Variables Table.


Add MAVEN_HOME variable

Update PATH variable by add the bin folder of MAVEN_HOME to system path

Make sure you have JAVA_HOME variable correctly

3. Check whether Maven is installed successfully by type command “mvn –version” in cmd

Formula:
java -cp "[compile folder]";"[JAR folder]\*" org.testng.TestNG [xml File]
For example:
java -cp "D:\Automations\Selenium\Workspace\SimpleTest\bin";"D:\Automations\Selenium\Workspace\SimpleTest\JAR File\*" org.testng.TestNG runTest.xml
Or we can create a batch file then edit it like following and save:
D:
cd "D:\Automations\Selenium\Workspace\SimpleTest"
java -cp "D:\Automations\Selenium\Workspace\SimpleTest\bin";"D:\Automations\Selenium\Workspace\SimpleTest\JAR File\*" org.testng.TestNG runTest.xml
pause
Idea: Creating a BaseTest class – The class is store all basic method and all others TestClass will be
inherited from it – as shown in below image:

Advantages of using OOP in designing test automation project:
Example:
The BaseTest class:
package myTestPack;

import org.openqa.selenium.*;
import org.openqa.selenium.firefox.FirefoxDriver;
public class BaseTest {
 protected static WebDriver driver;
 protected static String baseUrl;
 public static void setUp(){
 driver = new FirefoxDriver();
 driver.manage().window().maximize();
 driver.get(baseUrl);
 }
 public void login(String userName, String password) throws InterruptedException {
   driver.findElement(By. cssSelector("#userName")).sendKeys(userName);
   driver.findElement(By. cssSelector("#passWord")).sendKeys(password);
   driver.findElement(By. cssSelector("#submit")).click();
   Thread. sleep(2000);
 }
 public static void tearDown() throws InterruptedException{
   Thread. sleep(2000);
   driver.quit();
 }
 public boolean isElementPresent(By selector) {
   return driver.findElements(selector).size()>0;
 }
 public boolean isElementVisible(By selector){
   return driver.findElement(selector).isDisplayed();
 }
 //Execute java script Code
 public void jsCodeExecution(String jsCode){
   JavascriptExecutor js = (JavascriptExecutor) driver;
   StringBuilder stringBuilder = new StringBuilder();
   stringBuilder.append(jsCode);
   js.executeScript(stringBuilder.toString());
 }
}
The Test Class:
package myTestPack;
import org.openqa.selenium.By;
import org.testng.Assert;
import org.testng.annotations.Test;
import org.testng.annotations.BeforeMethod;
import org.testng.annotations.AfterMethod;
public class TestOne extends BaseTest {
 String textBoxCss = "input.gsfi";
 String searchBtnCss = "span.sbico";
@Test
public void testCase1() throws InterruptedException {
  driver.findElement(By. cssSelector(searchBtnCss)).click();
  Thread. sleep(4000);
  String s = driver.findElement(By. cssSelector( textBoxCss)).getText();
  s = StringUtil. trimSpace(s);
  Assert. assertEquals(s, "selenium");
}
@Test
public void testCase2() throws InterruptedException {
  driver.findElement(By. cssSelector(textBoxCss)).sendKeys("selenium" );
  driver.findElement(By. cssSelector(searchBtnCss)).click();
  Thread. sleep(4000);
}
@BeforeMethod
public void beforeMethod() throws InterruptedException {
  setUp();
  login("userName", "password");
}
@AfterMethod
public void afterMethod() throws InterruptedException {
  tearDown();
 }
}
After locating elements, now we will use Selenium command to interact with them. Interaction including click, input text, get text, ect. Below are all basic commands you need to learn before go to testcase creation:
Open Browser:
driver = new FirefoxDriver();
String chromePath ="D:\\chromedriver.exe";
System.setProperty("webdriver.chrome.driver", chromePath );
driver = new ChromeDriver();
String IEPath="D:\\IEDriverServer.exe";
System.setProperty("webdriver.ie.driver", IEPath);
DesiredCapabilities capab = DesiredCapabilities.internetExplorer();
capab.setCapability(InternetExplorerDriver.INTRODUCE_FLAKINESS_BY_IGNORING_SECURITY_DOMAINS,true);
driver = new InternetExplorerDriver(capab);
Close Browser:
driver.close();
//or
driver.quit();
Maximize Browser Windows:
driver.manage().window().maximize();
Open Url:
driver.get("google.com.vn");//Go to google.com.vn
Click on Element:
driver.findElement(By.cssSelector("button[type='submit']")).click();
Store text of targeted element in variable:
String text = driver.findElement(By.id("selenium")).getText();
Input text in text box or text area:
driver.findElement(By.id("textarea")).sendKeys("Selenium");
Get Page Title:
String title = driver.getTitle();//Store to variable
Get Current URL:
String url = driver.getCurrentUrl();//Store to variable
Navigation: Back, Foward and Refresh:
driver.navigate().back();
driver.navigate().forward();
driver.navigate().refresh();
Handling Alert, Confirmation and Prompt popup:
Generally alert message popup is displayed with alert text and Ok button as shown in bellow given Image:

And here is Confirmation Pop-up

Prompt Pop-up:

We can interact with them by using following commands:
 //Accept
driver.switchTo().alert().accept();
 //Discard
driver.switchTo().alert().dismiss();
 //Get Text of alert/confirmation pop-up
Alert A1 = driver.switchTo().alert();
String text = A1.getText();
//Input Text into Prompt Pop-up
Alert A2 = driver.switchTo().alert();
String text = A2.sendKeys("Thieu Nguyen");
A2.accept();
Handling multiple browser windows:
Suppose that you click on a button, and it opens a new page/tab. The following script will help you to choose what browser window you want to interact with:
 String window1 = driver.getWindowHandle();//Get window 1 handle
 //Click on submit button and it will open in new window (window 2)
 driver.findElement(By.cssSelector("h4.submit")).click();
 String window2 = driver.getWindowHandle();//Get window 2 handle
 /*Do something in window 2
 *
 */
 //Switch to window1
 driver.switchTo().window(window1);
 /*Do something in window 1
 *
 */
 //Switch again to window 2
 driver.switchTo().window(window2);
Wait:
Wait for several seconds:
//wait for 15 seconds
driver.manage().timeouts().implicitlyWait(15, TimeUnit.SECONDS);
Wait for element is clickable:
WebDriverWait wait = new WebDriverWait(driver, 15);//Time out is 15 seconds
wait.until(ExpectedConditions.elementToBeClickable(By.cssSelector("#submitButton")));
Wait for alert present:
 WebDriverWait wait = new WebDriverWait(driver, 15);
wait.until(ExpectedConditions.alertIsPresent());
Wait for alert present:
WebDriverWait wait = new WebDriverWait(driver, 15);
wait.until(ExpectedConditions.textToBePresentInElementLocated(By.xpath("//div[@id='selenium']"), "Selenium"));
Wait for element visible/invisible:
WebDriverWait wait = new WebDriverWait(driver, 15);
//wait for element visible
wait.until(ExpectedConditions.visibilityOfElementLocated(By.xpath("//input[@id='WebDriver']")));
//wait for element invisible
wait.until(ExpectedConditions.visibilityOfElementLocated(By.xpath("//input[@id='TestNG']")));
tobe continue…
After finishing install and config selenium WebDriver, now we go on with first automation script.
Create a New Project >> New Package >> New Class (ex: myTestClass.java)
Add Selenium library to your project. Insert below code into your program:
package myTestPack;

import org.openqa.selenium.WebDriver;
import org.openqa.selenium.firefox.FirefoxDriver;

public class myTestClass {
public static void main(String[] args) {
WebDriver driver = new FirefoxDriver();//Open FireFox Browser
driver.manage().window().maximize();//maximize current windows
driver.get("http://google.com");//Goto google.com site
String url = driver.getCurrentUrl();//Get current url
System.out.println(url);//Print the url to console screen
driver.close();//Close browser
  }
}
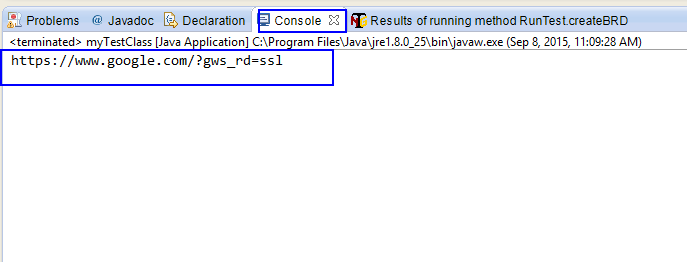
Click save, then right click on current class >> choose “Run As” >> “Java Application” and observe the result. It will open FireFox browser, maximize windows, then access to google site, get current url and print it to elcipse console windows as the picture below:
Locating WebElements is the job to find and match the elements of your page that it needs to interact with. It contains “Find Element” and “Find Elements” method. The first returns a WebElement object otherwise it throws an exception. The latter returns a list of WebElements, it can return an empty list if no DOM elements match the query.
Browser Tools For Element Inspection:
Below are common locators strategies used in Selenium:
By ID

WebElement element = driver.findElement(By.id("Selenium"));
By Class Name

WebElement element = driver.findElement(By.className("WebDriver"));
By Tag Name

WebElement element =driver.findElement(By.tagName("textarea"));
By Link Text/ Partial Link Text

WebElement element = driver.findElement(By.linkText("Test Execution"));//By linktext
WebElement element = driver.findElement(By.partialLinkText("Execution"));//By Partial linktext
By Css Selector
CSS – Cascading Style Sheets – language used for describing the presentation semantics of a document written in a markup language such as HTML or XML.
In CSS, selectors are patterns used to select the element(s) you want to style.
In selenium, we can use CSS selector to indicate the element that need to be interacted.
Below are some basic syntaxs of CSS Selector:

Example:

WebElement element;
element = driver.findElement(By.cssSelector("#comment-issue")); //using id
element = driver.findElement(By.cssSelector("ul#comment-issue")); "));//using id and tag
element = driver.findElement(By.cssSelector("ul#comment-issue[title~='issue']")); //using id,tag and partial of attribute

WebElement element;
element = driver.findElement(By.cssSelector(".issue-link") //using class
element = driver.findElement(By.cssSelector(".issue-link[title='WebDriver']") //using class and attribute
element = driver.findElement(By.cssSelector("a.issue-link[title='WebDriver']") //using tag, class and attribute
element = driver.findElement(By.cssSelector(".stsumary a.issue-link") //using many class levels – 'issue-link' is a child of 'stsumary' class
Read more about Css Selector here
By Xpath

In the table below we have listed some path expressions and the result of the expressions:

Read more about Xpath here
Step 1 : Download and install Java in your system
Click here to download Java and install it in your system as per given installation guide over there.
Step 2 : Download and install Eclipse
Download Eclipse for Java Developers and extract save it in any drive. It is totally free. You can run ‘eclipse.exe’ directly so you do not need to install Eclipse in your system.
Step 3 : Download WebDriver Jar Files.
Selenium webdriver supports many languages and each language has its own client driver. Here we are configuring selenium 2 with java so we need ‘webdriver Java client driver’. Click here to go on WebDriver Java client driver download page for webdriver download file. On that page click on ‘Download’ link of java client driver as shown in bellow image.

(language-specific client driver’s version is changing time to time so it may be different version when you will visit download page. )
Downloaded ‘webDriver Java client driver’ will be in zip format. Extract and save it in your system (ex: D:\selenium-2.46.0) . There will be ‘libs’ folder, 2 jar files and change log in unzipped folder as shown in bellow figure. We will use all these files for configuring webdriver in eclipse.

Step 4 : Start Eclipse and configure it with selenium 2 (webdriver)
Double click on ‘eclipse.exe’ to start eclipse. First time when you start eclipse, it will ask you to select your workspace where your work will be stored as shown in bellow image. Create new folder in D: drive with name ‘Webdriverwork’ and select it as your workspace. You can change it later on from ‘Switch Workspace’ under ‘file’ menu of eclipse.

After selecting workspace folder, Eclipse will be open.
Create new java project from File > New > Project > Java Project and give your project name ‘testproject’ as shown in bellow given figures. Click on finish button.


Now your new created project ‘TestingProject’ will be displayed in eclipse project explorer as bellow.

Right click on project name ‘TestingProject’ and select New > Package. Give your package name = ‘myTestPack’ and click on finish button. It will add new package with name ‘myTestPack’ under project name ‘TestingProject’.

Right click on package ‘myTestPack’ and select New > Class and set class name = ‘myTestClass’ and click on Finish button. It will add new class ‘myTestClass’ under package ‘myTestPack’

Now your Eclipse window will looks like bellow.

Now you need to add selenium webdriver’s jar files in to java build path.
Right click on project ‘TestingProject’ > Select Properties > Select Java build path > Navigate to Libraries tab
Click on add external JARs button > select both .jar files from D:\selenium-2.46.0
Click on add external JARs button > select all .jar files from D:\selenium-2.46.0\libs
Now your TestingProject’s properties dialogue will looks like bellow.

That’s all about configuration of WebDriver with eclipse. Now you are ready to write your test in eclipse and run it in WebDriver.
